
Make a cheerful storage solution (and eight whimsical cards) when you pair Club Scrap's Whimsy Card kit with the 5x7 Card Caddy Components kit.

Project Prep
The Components kit includes downloadable instructions, a link to a video tutorial, and the supplies needed to build the basic card caddy structure.
In addition, you'll need two prints and nine plains to decorate the caddy and complete eight bonus cards. Since the Whimsy Card Kit includes two prints and eight plains, I added one 12x12 Black Plain to the mix.
All of the plains in the Whimsy collection are duplex papers. To replicate this project, use the following paper substitutions for each step in the instructions:
1-3 = (5) Card Caddy Black Plains (in components kit)
4-5 = (2) Green Duplex
6-7 = (2) Card Print
8 = Orange, Pink, Green, Blue
9 = Orange, Pink
10 = (1) Black Plain (from stash)
Once the paper substitutions are determined, completing the project is easy. (Be sure to tune in to Tricia's 5x7 Card Caddy video tutorial if you need extra support.)
- Trim the papers according to the cutting diagrams.
- Follow the instructions to assemble the caddy.
- Sort and dry fit the trimmed papers to create the cards.
- Distribute the Cutapart artwork and sentiments to complete each card.
- Embellish as desired.
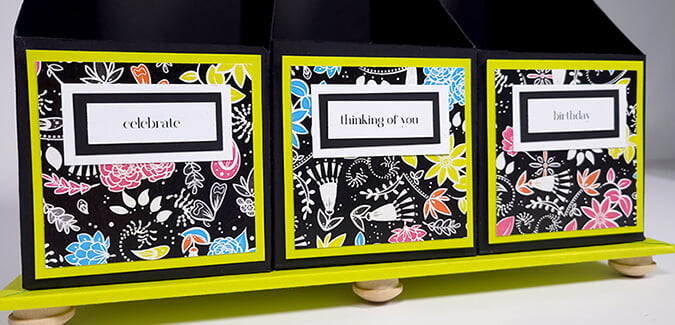
Whimsy Card Caddy

Customize the caddy to fit your needs with your choice of label for each divided section.

The "greetings" Cutapart finds the perfect home centered on the back side of the project. Now the caddy's purpose is recognizable from both angles.
Whimsy BONUS 5x7 Cards
Set A: Single Fold Cards
Once the card bases and panels have been sorted, consult the sample photos in the instructions as a guide for assembly. Add Cutaparts to the exterior and interior of each card, making modifications as necessary.

Align the "congratulations" Cutpart with the right side of the strip. Accent with black enamel dots.

Inside, anchor the coordinating "innie" sentiment with a leftover paper strip.


Set B: Square Flap Cards

Create two interlocking loops of ribbon and wrap them around the sentiment Cutapart, taping the ends to the back side. Center onto the square flap. Tuck the jumbo flower sequin underneath the right edge, and secure with bookbinding glue.


Adhere the "innie" sentiment inside.

Wrap a length of ribbon around the nested square mats, and tie into a simple knot. Attach a sentiment directly over the ribbon with foam adhesive.

Inside, trim the sentiment strip to match the height of the card. Accent with a jumbo flower sequin.
Isn't this the most cheerful card storage solution you've ever seen? I can't wait to fill it with additional cards as a gift for my daughter.
Have you made a card caddy recently? If so, be sure to share photos of your finished project on our Club Scrap Chat group on Facebook. It's the perfect place to inspire - or be inspired by - fellow paper crafters.