
Create even more Wanderer pages with just four sheets of paper, stamps and the August Bonus Formula!
Members: Check your inbox for your member-exclusive email with important links to the bonus formula, instructions, video tutorials and more. It is sent to active members* on their scheduled shipping day and looks like this:

*An active member is defined as one who paid for and received the current monthly kit.
August Page Formula Sketch

Bonus Formula Assembly Tips
Download the monthly bonus page formula. Gather four papers as noted on the printable document. I chose the following plain papers from the Wanderer collection:
Paper A - Navy
Paper B - White
Paper C - Kraft (LB), Orange (RB)
Create custom printed papers with the help of Club Scrap Hybrid Inks and stamps. It's a great way to extend your supplies to make tons of pages with lots of interest featuring different designs and a coordinating palette.

Choose CS® Hybrid inks to complement the paper colors: Sapphire, Tangerine, Earth and India ink. (Did you know Tricia makes ink suggestions to coordinate with each monthly kit? Be sure to check out her blog post released on shipping day each month.)

Select images from the Wanderer stamp sheet. Ink and stamp the images at random onto the paper.

Continue adding images until the desired effect is achieved. Note: Stamping some images "off" the edge of the paper makes it look truly random.

Trim the Navy and White (stamped) papers according to the instructions on the document. Dry fit the pieces using the sketch as a guide. (Reserve the one tiny scrap to use as an embellishment.)

Distress the edges of the small squares with Earth Ink.

Stamp the compass image onto a white scrap (from my stash) with Sapphire Ink. Fussy cut with detail scissors. Wrap jute twine around the top and tie into a bow.

To add the white embossed sentiment, begin by brushing the skinny border strip with anti-static powder. Stamp the sentiment with Watermark ink.

Top with white embossing powder and heat set to melt.

Ensure proper alignment of the skinny strip with a grid ruler as your guide.

Align the ruler with the long edge of the skinny strip to add the horizontal stamped panel.

Trim the reserved tiny Navy scrap in the shape of an arrow with scissors. Tie a tiny bit of twine into a bow and adhere to the strip. Apply Bookbinding Glue dispensed from a Needle-tipped Applicator to the back side and adhere to the page.

Place the right page into a stamping platform. Align the sentiment stamp face down above the photo mat.

Close the lid to pick up the stamp. Open the lid, ink with Sapphire and stamp the sentiment onto the page. Repeat as necessary to achieve a crisp impression.

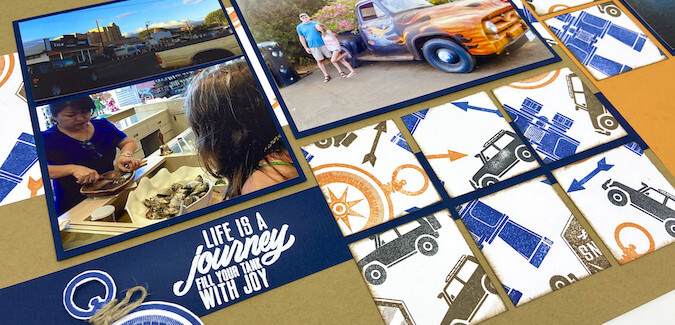
Wanderer Bonus Layout - Before Photos

Temporarily place photos over the mats to determine the best fit/arrangement. Note: Don't be afraid to crop two horizontal photos together on a vertical mat.

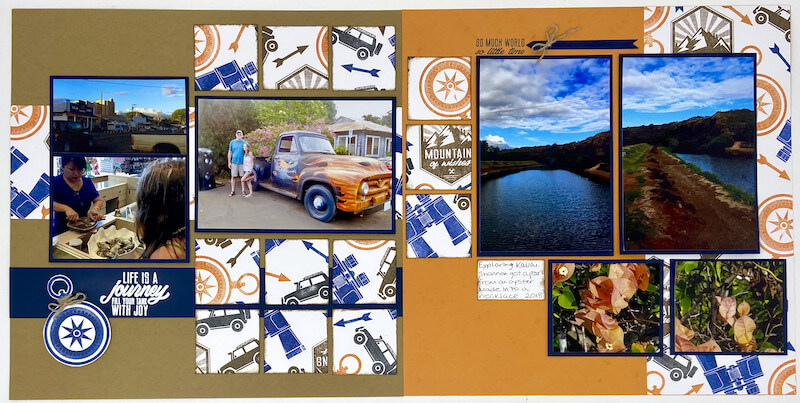
Completed Layout
We love it when you post your artwork inspired by what you have seen on our blog posts! Join us on the Chat Group on Facebook to share artwork, participate in monthly challenges and chat with Club Scrap Fans from all over the world. Not a member of the group yet? Simply answer a few questions and we will accept your request in no time.
CS Hybrid Ink Pads
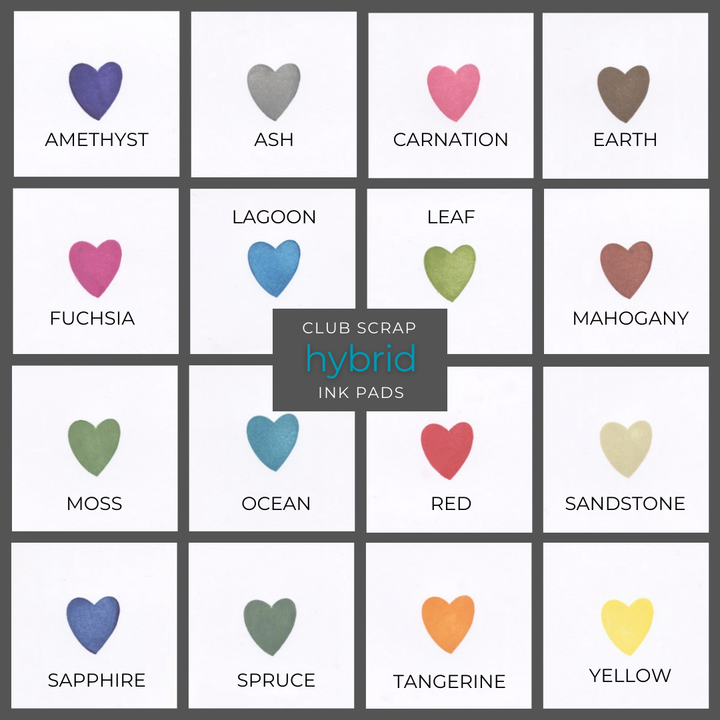
$6.35
Exclusively Club Scrap®, this hybrid craft ink combines the most exceptional ingredients of both pigments and dyes for a fine, crisp, fast-drying image! Don't forget to stock up on the coordinating re-inkers. Each ink pad sold separately. Please select the… Read More
CS Watermark Ink Pad

$6.40
This clear ink creates a "watermark" effect on all kinds of papers. Ideal for use with embossing powders and for resist techniques. Create watermark or light shadow images on uncoated card stock Use for Batik-like dye ink resist effects on… Read More