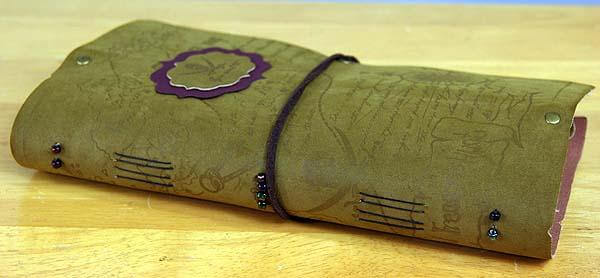

I've been mulling over an idea since the August Retreat, and I finally got around to making a prototype after I saw a small stack of extra leather pencil rolls on Deb's production table in the warehouse. (They were a super-cool parting gift presented to Retreat attendees on Sunday morning.)

I ran off with a sample to see if my idea would work. Turns out my vision made a pretty nifty stitch bound journal.

Even though we only have a small handful of kits available, I couldn't resist putting together the "Treasure Map Journal" project kit and this tutorial. NOTE: If you attended the Retreat or purchased the Retreat in a Box, you've got the pencil roll in your stash!
SUPPLIES REQUIRED:
- Treasure Map Journal Kit (Includes papers, pencil roll, beads, and waxed linen thread)
- 12" Paper Trimmer
- Craft Knife and Cutting Mat
- Grid Ruler
- Pencil
- Bone Folder
- Tapestry Needle (Blunt Tip)
- Paper Piercing Tool and Cork Board
- Scor-Pal (Optional)
- Scissors
BOOK ASSEMBLY
1. Check the grain direction of each 12x12 sheet of cover weight paper. Place into the trimmer so the paper "dips" easily from top to bottom; cut at 8". Trim the 8x12 horizontally at 8.5".


2. Select 16 sheets from the 18 Kraft Text Weight Prints included in the kit. Check grain direction and trim as in step one. If using a Fiskars Guillotine Trimmer, you should be able to trim three sheets at a time. (Save all scraps.)


3. Fold each sheet in half to make a 4.25x8" folded page. Burnish folds with a bone folder.

4. Open one folded sheet of cover weight paper and place onto a cork board. Using a ruler and paper piercing tool, pierce eight stitching holes directly into the center fold at 1/2, 1-1/2, 2-1/2, 3-7/8, 4-1/8, 5-1/2, 6-1/2 and 7-1/2". This paper will serve as a piercing template.

5. Unfold and nest four text weight pages together. Place the piercing template on top and pierce to transfer the stitching holes to the pages beneath. TIP: Align papers carefully and pierce directly into the fold line. Repeat process with the same original template until all text weight and cover weight pages have been pierced.

6. Nest the pages together into four signatures consisting of four text weight pages and one cover weight page on the outside.

7. Use a sharp craft knife, ruler and cutting mat to remove the top inside flap from the pencil roll. (This allows pages to be sewn into the book without trapping the flap on top of the pockets.) Set aside the 2x6.5" piece.


8. There is a stitched seam directly in the center of the pencil roll. Place a grid ruler vertically onto the roll, just to the right of the seam. The height of the stitched pocket area is almost exactly 8 inches. Align the "0" edge of the ruler at the top edge of the pocket and pierce at the same measurements as before: 1/2, 1-1/2, 2-1/2, 3-7/8, 4-1/8, 5-1/2, 6-1/2 and 7-1/2".

9. Repeat the piercing process to create a total of four vertical columns of stitching holes 1/8" apart, two on the right side of the seam, and two on the left.

10. Thread the needle with waxed linen. Select one of the four signatures and enter the top hole from the outside to the inside of the fold. Leave a thread tail of about 4".

11. Align the signature with the fourth vertical column of stitching holes on the cover. (We will stitch signatures from the back of the book to the front.) Exit the second hole of the signature, going through the papers and the corresponding hole on the cover.

12. Stitch back into the third hole, exit the fourth, attach a bead to the thread (removing the needle, if necessary), and continue to stitch in and out until reaching the bottom of the signature.

13. Exit the bottom hole to the outside of the cover, add a bead, and enter the nearest hole to begin attaching a new signature.

14. Stitch the signature in the same fashion, adding a bead at the center. When reaching the top (head) of the book, exit the hole in the signature ONLY, not the outside cover.

15. Add the third signature with the same running stitch to the bottom, adding a bead at center and at the bottom.


16. Stitch the fourth signature to the cover. Exit the cover at the last hole.

17. Add a bead, stitch into the nearest hole through the cover only. Exit the neighboring hole, add another bead, and stitch into the final hole of the cover only.


18. Locate the starting thread tail and tie into a square knot. Trim and tuck thread tails.

19. Enjoy a celebratory beverage of your choice.
OPTIONAL INSIDE PAGE DECOR
1. To make page pockets, score each 4x12 cover weight paper horizontally at 1, 5, 7, and 11". Rotate and score vertically at 1".

2. Trim each scored piece horizontally at 6".

3. Cut two corners at a 45 degree angle and fold along score lines to create three flaps.


4. Adhere the pocket flaps to random inside pages.

5. Trim the remaining 3.5x8 cover weight papers horizontally at 7.5". Trim four sheets of 3.5x8 Kraft Text Weight Prints vertically at 3.25 and horizontally at 7.25". Nest, plain side up, onto the cover weight panels and insert into the pockets.


6. Trim the remaining 3.5x8 Kraft Text Weight Prints horizontally at 7.25". Adhere plain side up onto printed pages in the book that land on the "right hand" side (or dominant hand side for our lefties) to allow for more journaling space.

7. Dream up some additional ideas for the remaining 4x12 papers. I was completely tapped out and didn't think of anything.
8. Use your favorite die cutting equipment to cut the buccaneer from the center of the leather pocket flap in the shape of your choice. Nest onto a slightly larger die cut and adhere to the book cover.


9. Insert pens and pencils into the pockets.

10. Have an adventure. Take your notebook along.


If you'd like, take a quick video tour of the project:
I had a blast making this project, and I think you'll be surprised by how simple it is to put together. Act quickly to be sure you don't miss out on the project kits.
Tricia