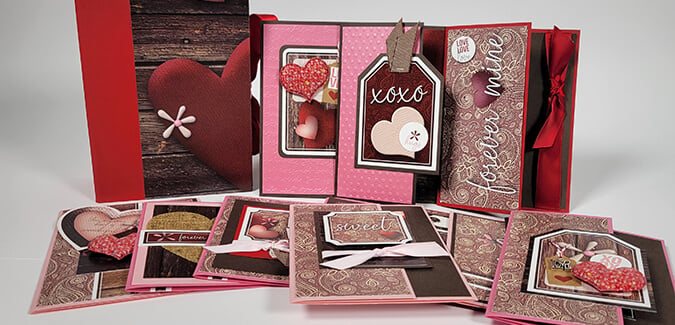

Each time we launch a special release page kit, we often get the same question: "Is there a card kit?" I always tell folks the same good news/bad news: No, we don't have a card version of that kit, but you CAN turn any special release into a generous batch of greeting cards. To demonstrate this concept, I spent a few hours this weekend transforming the just-released Sweet on You Remix into a dozen cards and a beautiful keepsake box.
Sweet on You Keepsake Box
Ever since I was a child swapping Valentines with classmates, I've had a sentimental attachment to cards - especially handmade ones. With this in mind, I used four sheets of Sweet on You paper, along with the Drop Spine Box Components kit, to construct a beautiful box to hold these treasured keepsakes.
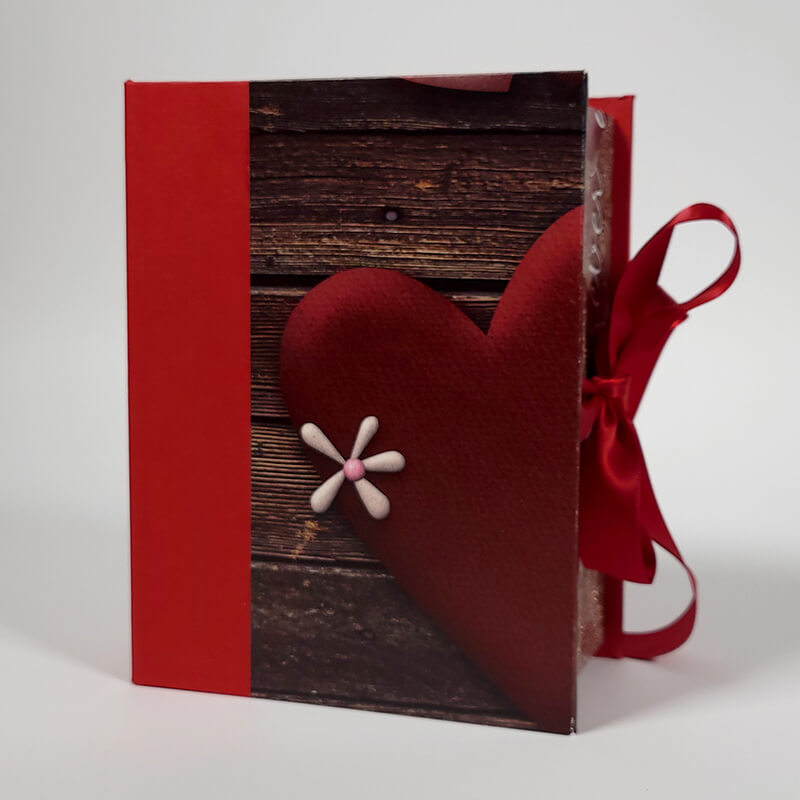
To build one for yourself, purchase the components kit which includes the project instructions. For a box that looks like mine, use the following paper assignments: (2) Red Plain (Paper A), one Love Print (Paper B) and one Wood Print (Paper C). Follow the paper trimming and assembly instructions to complete the box.

If you plan carefully enough, you'll be able to preserve the "forever mine" sentiment when wrapping the box frame.

Sweet on You Cards
Obviously these cards make super-sweet Valentines, however, the general "love" theme is also appropriate for weddings, anniversaries and more.

To create these greetings, I recycled the card formula from the Baby, Baby Cards. If you're interested in replicating my cards, use the paper substitutions below for each cutting diagram. (You should end up with two papers left over, one light and one dark pink.)
- Red, Dark Pink, Light Pink, Brown
- Brown
- Light Pink
- Love Print
- Brown
- Wood Print
- Dark Pink
Follow the trimming, sorting, and assembly instructions to make six each of two different styles/sizes. There are plenty of cutaparts and other embellishments to complete all twelve cards - outside and inside!
4.25x5.5" Cards
Since they say a picture is worth a thousand words, enjoy a visual tour of each card - outside followed by inside (where applicable).
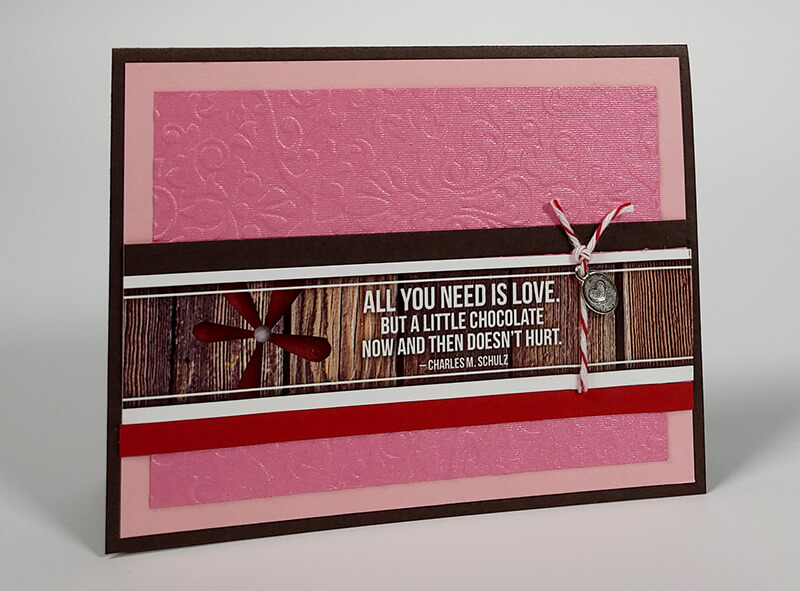
Use a piece of red/white baker's twine or waxed cord from your stash to tie the heart charm onto the cutapart strip. Glue 1/4" scraps above and below for added color contrast. Don't be afraid to add texture to some panels using embossing folders.

Use baker's twine to tie the heart charm onto the mini white tag.


Use bookbinding glue on a foam brush, rather than the needle-tipped applicator, to apply adhesive to the back of the burlap heart. (Unless you like the idea of dark polka-dots of glue peeking through. Wink-wink.)


The "love" print panel was so pretty on its own, it didn't need any additional embellishment.


Trim the large red printed cutapart to become a nesting mat on this card.

4.5x6.25" Cards
Create a collage to cleverly disguise the journaling lines on the cutapart tag.

Glue the love charm onto the kraft mini tag, top with baker's twine. Use a 1-inch circle punch to remove the "XO" sentiment from the cutapart sheet; adhere using foam dots. Finish with the quilted heart.


I couldn't bear to cover the "forever mine" panel. Use a circle punch to remove "love" sentiment from cutaparts, adhere using foam adhesive.


Fussy-cut the "wonderful" sentiment from the cutaparts, add a tag and quilted heart to decorate the front panel.


Another clever collage disguises journaling lines on this cutapart panel.


Trim the large "chocolate" cutapart to fit the panel inside the fold.


Trim the "loved you then" title strip into 2.25" sections. Adhere to the left side of the inside panel.

Whew - twelve cards and a coordinating box in one afternoon! If you're really on a roll, use an additional card formula to make card bases and panels from the left over light pink and dark pink papers. Simply add sentiments using cutaparts or stamps from another Club Scrap collection to complete them.
I hope my project inspires you to make something beautiful and useful from your favorite special release collection. And if you do make something, please share it on the Club Scrap Chat Facebook group. There's no such thing as too much inspiration!
Happy crafting.
Drop Spine Box Components

$13.50
Contains (8) pieces of 1/8" thick book board. Makes one drop spine box measuring 5.25x7x3". (A few additional materials and tools will be required.) Kit contains two book board covers, one spine, one box base, two short walls and two… Read More