Create a gorgeous variety of paisley Gelli prints with the Western Masking Stencil paired with Distress Oxide inks.
![](https://cdn.shopify.com/s/files/1/0440/9602/8828/files/Paisley-Gelli-Prints-Western-Masking-Stencil-25_480x480.jpg?v=1606321875)
![](https://cdn.shopify.com/s/files/1/0440/9602/8828/files/Paisley-Gelli-Prints-Western-Masking-Stencil-25.jpeg)
Paisley Gelli Prints
Apply rows of Distress Oxide Ink colors to the surface of a Gelli Arts Printing Plate. Press the pads directly onto the plate to add the colors.
![](https://cdn.shopify.com/s/files/1/0440/9602/8828/files/Paisley-Gelli-Prints-Western-Masking-Stencil-13.jpeg)
Lay the masking stencil onto the inked plate.
![](https://cdn.shopify.com/s/files/1/0440/9602/8828/files/Paisley-Gelli-Prints-Western-Masking-Stencil-21_480x480.jpg?v=1606321928)
![](https://cdn.shopify.com/s/files/1/0440/9602/8828/files/Paisley-Gelli-Prints-Western-Masking-Stencil-21.jpeg)
Place a sheet of scrap paper over the stencil and plate. Apply firm, even pressure over the entire surface of the plate to remove some of the colors.
![](https://cdn.shopify.com/s/files/1/0440/9602/8828/files/Paisley-Gelli-Prints-Western-Masking-Stencil-22.jpeg)
![](https://cdn.shopify.com/s/files/1/0440/9602/8828/files/Paisley-Gelli-Prints-Western-Masking-Stencil-22_480x480.jpg?v=1606321950)
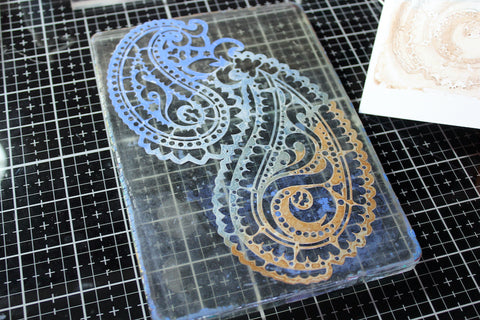
Remove the scrap paper and lift the stencil from the plate. Set the inky stencil aside to be used for making an additional print.
![](https://cdn.shopify.com/s/files/1/0440/9602/8828/files/Paisley-Gelli-Prints-Western-Masking-Stencil-23_480x480.jpg?v=1606321977)
![](https://cdn.shopify.com/s/files/1/0440/9602/8828/files/Paisley-Gelli-Prints-Western-Masking-Stencil-23.jpeg)
Lay a plain white panel onto the Gelli plate. Rub the back of the paper to ensure a good ink color transfer.
![](https://cdn.shopify.com/s/files/1/0440/9602/8828/files/Paisley-Gelli-Prints-Western-Masking-Stencil-24.jpeg)
![](https://cdn.shopify.com/s/files/1/0440/9602/8828/files/Paisley-Gelli-Prints-Western-Masking-Stencil-24_480x480.jpg?v=1606321998)
Remove the paper to reveal the print.
![](https://cdn.shopify.com/s/files/1/0440/9602/8828/files/Paisley-Gelli-Prints-Western-Masking-Stencil-14_480x480.jpg?v=1606322023)
![](https://cdn.shopify.com/s/files/1/0440/9602/8828/files/Paisley-Gelli-Prints-Western-Masking-Stencil-14.jpeg)
Lay the inky stencil onto the Gelli plate ink side up.
![](https://cdn.shopify.com/s/files/1/0440/9602/8828/files/Paisley-Gelli-Prints-Western-Masking-Stencil-26_480x480.jpg?v=1606322050)
![](https://cdn.shopify.com/s/files/1/0440/9602/8828/files/Paisley-Gelli-Prints-Western-Masking-Stencil-26.jpeg)
Spritz the stencil lightly with water to activate any dried Oxide Inks. Lay a second plain white panel over the plate and make the print.
![](https://cdn.shopify.com/s/files/1/0440/9602/8828/files/Paisley-Gelli-Prints-Western-Masking-Stencil-15.jpeg)
![](https://cdn.shopify.com/s/files/1/0440/9602/8828/files/Paisley-Gelli-Prints-Western-Masking-Stencil-15_480x480.jpg?v=1606322099)
Try other combinations of colors to create even more paisley prints.
![](https://cdn.shopify.com/s/files/1/0440/9602/8828/files/Paisley-Gelli-Prints-Western-Masking-Stencil-1.jpeg)
![](https://cdn.shopify.com/s/files/1/0440/9602/8828/files/Paisley-Gelli-Prints-Western-Masking-Stencil-9.jpeg)
Paisley Gelli Print Cards
Trim the prints into panels for cards.
![](https://cdn.shopify.com/s/files/1/0440/9602/8828/files/Paisley-Gelli-Prints-Western-Masking-Stencil-19_480x480.jpg?v=1606322149)
![](https://cdn.shopify.com/s/files/1/0440/9602/8828/files/Paisley-Gelli-Prints-Western-Masking-Stencil-19.jpeg)
Stamp the Western sentiments onto the empty spaces on the gelli prints.
![](https://cdn.shopify.com/s/files/1/0440/9602/8828/files/Paisley-Gelli-Prints-Western-Masking-Stencil-20_480x480.jpg?v=1606322175)
![](https://cdn.shopify.com/s/files/1/0440/9602/8828/files/Paisley-Gelli-Prints-Western-Masking-Stencil-20.jpeg)
Layer the panels onto Brown Gelli print panels.
![](https://cdn.shopify.com/s/files/1/0440/9602/8828/files/Paisley-Gelli-Prints-Western-Masking-Stencil-18.jpeg)
![](https://cdn.shopify.com/s/files/1/0440/9602/8828/files/Paisley-Gelli-Prints-Western-Masking-Stencil-18_480x480.jpg?v=1606322198)
Adhere to folded card bases created with the Western Rope print.
![](https://cdn.shopify.com/s/files/1/0440/9602/8828/files/Paisley-Gelli-Prints-Western-Masking-Stencil-cards-1_480x480.jpg?v=1606322231)
![](https://cdn.shopify.com/s/files/1/0440/9602/8828/files/Paisley-Gelli-Prints-Western-Masking-Stencil-cards-1.jpeg)
![](https://cdn.shopify.com/s/files/1/0440/9602/8828/files/Paisley-Gelli-Prints-Western-Masking-Stencil-cards-2_480x480.jpg?v=1606322242)
![](https://cdn.shopify.com/s/files/1/0440/9602/8828/files/Paisley-Gelli-Prints-Western-Masking-Stencil-cards-2.jpeg)
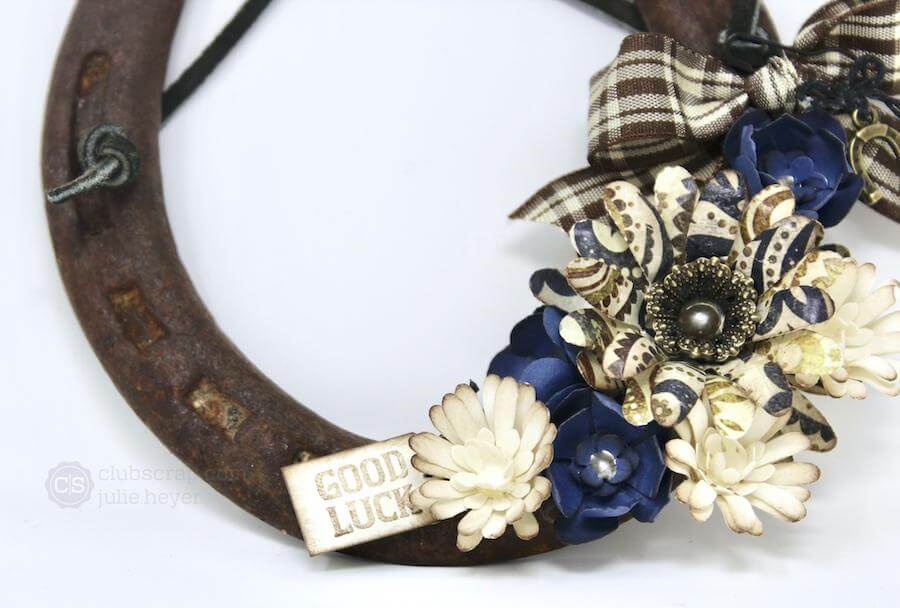
I love this Gelli print created by the stencil when lightly misted with the water. Pair it with a fussy cut stamped decorative square with a banner and sentiment to create a perfect embellishment cluster.
![](https://cdn.shopify.com/s/files/1/0440/9602/8828/files/Paisley-Gelli-Prints-Western-Masking-Stencil-cards-3.jpeg)
![](https://cdn.shopify.com/s/files/1/0440/9602/8828/files/Paisley-Gelli-Prints-Western-Masking-Stencil-cards-3_480x480.jpg?v=1606322281)
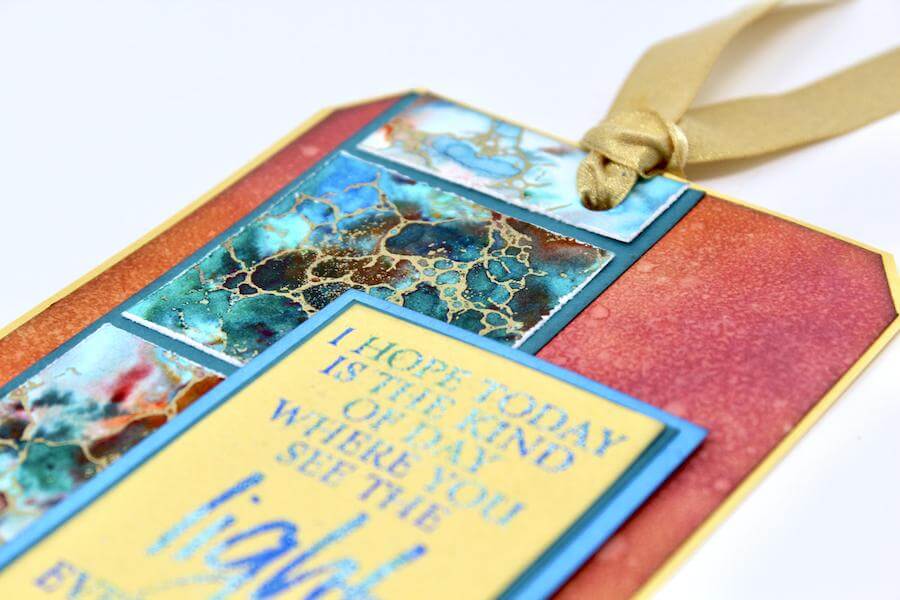
Walnut Distress Oxide Ink applied to the Gelli plate creates this simple paisley background on the Gold panel. The flag strip was a scrap leftover after trimming the Gelli print panel from the card above. I never let anything go to waste!
![](https://cdn.shopify.com/s/files/1/0440/9602/8828/files/Paisley-Gelli-Prints-Western-Masking-Stencil-cards-6.jpeg)
![](https://cdn.shopify.com/s/files/1/0440/9602/8828/files/Paisley-Gelli-Prints-Western-Masking-Stencil-cards-6_480x480.jpg?v=1606322299)
Be sure to check out some of my favorite Gelli Printing Blog Posts from the Past. Happy Crafting!
Cobblestone Stencil Gelli Prints
![](https://cdn.shopify.com/s/files/1/0440/9602/8828/files/Julie-2018.png)