
Create gorgeous dimension and deep, rich color with the Painted Texture Paste technique and the Farmstand Farm Fresh Stencil.

To say I love this stencil is a huge understatement. There is just something about an old vintage truck in red that conjures up so much nostalgia. I had to use it with a homemade paste recipe made from a selection of Club Scrap's Stipple Mists.
Painted Texture Paste Technique
Make a small batch of homemade paste with three simple ingredients: baby powder, Bookbinding Glue and white acrylic paint.

Cover the words and corn on the stencil with washi tape. Spread a thin layer of paste over the truck, covering all open areas evenly.

Carefully remove the stencil and repeat with additional panels, if desired. Tip: Make more than one panel so you have extras for practice. Remember, your first try with any technique or project is a prototype!

Wash the stencil immediately with warm soapy water.

Stencil the Pacific Northwest pine tree image on a white panel with Spruce ink.

Offset the stencil slightly and spread texture paste over the inked tree.

Dab the paste with the back of the knife to create a stippled texture.

Carefully remove the stencil and remember to clean it immediately with warm soapy water. Set all of the texture paste images aside to dry completely before moving on to the next step.

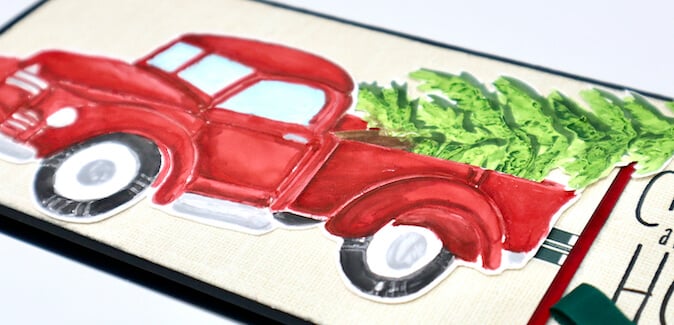
Gather Slate, Cherry, Burnt Umber, and Leaf Stipple Mists, metallic silver acrylic paint, paint brushes, water, and paper towel. Pour a small amount of Stipple Mists and paint onto a plate or palette. Apply Cherry Stipple mist paint to the body of the truck.

Paint the bumper, door handle, hub caps, running board, and grill with metallic silver paint. Finish the truck painted details with the tires in Slate Stipple Mist.

Add a drop or two of water to the Burnt Umber stipple mists. Paint over the body of the truck to add shading details.

Add a generous amount of color to the texture paste branches of the tree with Leaf Stipple Mist. Add Burnt Umber Mist paint to the tree trunk. Set aside the truck and tree to dry completely.

Card Assembly
Fussy Cut the tree and truck.

Cut a slit in the bed of the truck with a craft knife.

Slide the tree at an angle into the slit and secure on the back of the truck with clear tape.

Paint the window and windshield with Tumbled Glass Distress Stain applied with a waterbrush.

Make the perfect panel for this 4x9.5" slimline black card with some clever cutting of the Farmstand Border Print. I love the burlap background design. Rotate the two panels so that the green and white box strips are running parallel to one another to camouflage the seam.

Stamp the Christmas In The Neighborhood sentiment in India Ink on a left over scrap from the trimmed Border Print. Layer with a Red Panel and accent with a green bow. This sentiment is so perfect!!

Adhere the truck and tree over the Border Print panel and complete the card with the matted sentiment. Let's take another look at the finished card.

Have you started making your holiday cards? This is my first of many and I hope it inspires you to get started. Happy crafting!
Julie