
Create an adorable Let It Bee Wall Hanging from "planks" made out of a Club Scrap pizza box.

I love thinking outside the box, quite literally. If you have followed the blog for some time, you know that I love turning this familiar packaging into crafty creations. I was inspired by a paper flower artist I follow on Facebook to recreate one of her amazing home decor projects.
Let It Bee Wall Hanging
Deconstruct a pizza box and remove the lid and base of the box with a utility craft knife, cutting mat and ruler. Cut the top of the box into vertical planks 1-1/2" wide and the base into horizontal planks 1-1/2" wide to ensure that the grain direction (fluting) for each set of planks is running in opposite directions. Apply Bookbinding Glue from a Needle-tipped Applicator to a vertical grain plank and adhere to a horizontal grain plank. Repeat for the remaining boards. Cut each double thickness board into 12" lengths.

Gather three planks and set the rest aside for another project. Cut each plank in half at 6", resulting in six 1-1/2x6" planks.

This next step is optional. I wrapped each of the planks with kraft packing paper to cover the exposed corrugated cardboard edges.

Trim a Let It Bee Honeycomb print into four 1-3/8 x 5-7/8" panels. Distress the edges with Earth Ink and an Ink Applicator Brush.

Apply Bookbinding Glue with a Needle-tipped Applicator to the back of each panel and center onto four of the pizza box planks.

Lay two of the planks vertically on a Club Scrap Grid Paper Pad leaving 2-1/2" between them. Apply glue to the top of each plank and adhere each horizontal plank ensuring a 3/8" inch gap between them. Continue until all of the planks are glued into place.

Flip the wall hanging over. Cut a 10" length of plaid ribbon and secure to the vertical boards with glue.

Wall Hanging Embellishments
Cut yellow and brown twine into 10" pieces. Trim 5" lengths of page and card ribbons and lay in a star formation over the twine.

Carefully gather the ribbons together with the twine.

Tie the twine into a bow and rearrange the ribbons as needed.

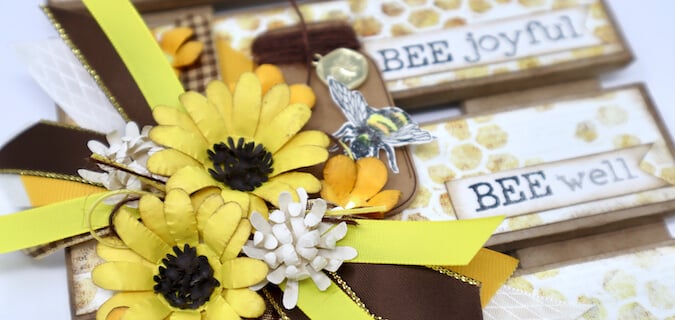
Wrap a kraft jar tag with brown twine, thread on a bumble bee coin, and finish with a knot.

Stamp a small bee image on the back of an Ivory Linen panel in India Ink. Add details with colored pencils on the body and Clear Nuvo Drops on the wings.

Stamp a variety of "BEE" sentiments in India Ink on the back of an Ivory Linen panel and cut into flag shapes.


Cut paper flowers with a variety of punches in different sizes and shapes with the Pack of Panels and Card Kit Handmade papers. Arrange the flowers over the ribbon cluster and adhere with hot glue.

Fussy cut the bee and adhere to the front of the mason jar nestled next to the ribbon and flower cluster.

Add a dot of glue to the centers of each of the Dk. Yellow flowers. Place a Yellow Crystal over the glue for a super sparkly accent.


Let's take a look at the finished wall hanging.

I hope you enjoyed this tutorial as much as I enjoyed making it. Hap"Bee" Crafting!
 Julie
Julie